
Introduction: Regulatory Background and Article Overview
In modern vehicle safety technology, the Autel TPMS system plays a crucial role. According to the U.S. Federal Motor Vehicle Safety Standard FMVSS No.138 (49 CFR §571.138), since September 1, 2007, all light vehicles (GVWR ≤ 10,000 lb) sold in the U.S. are required to be equipped with a Tire Pressure Monitoring System (TPMS), which must trigger an alert when tire pressure drops below the manufacturer’s recommended value by 25%. Similarly, the European Union’s ECE R64 (Rev.4) regulation mandates that, starting from November 1, 2014, new registrations of M1 category vehicles (≤9 seats) must also be equipped with TPMS, with an alert threshold matching the U.S. requirements.
This article will provide a comprehensive overview of the Autel TPMS solution, strictly based on Autel’s official technical documentation and support information. It will offer verifiable, actionable steps, covering the selection of MX-Sensor (including BLE models), sensor installation and removal, the three official learning/programming modes, validation and troubleshooting, and maintenance of dual tire sets. All information will align with Autel TPMS official requirements, helping readers better understand how to implement and operate the system.
1. Autel TPMS Solutions and Device Matrix (based on official information)
Autel TPMS offers a range of programmable sensors and devices designed to meet the needs of various vehicle types and maintenance scenarios. Here, we will discuss the different products in the Autel TPMS lineup and their capabilities. Each device is tailored to specific use cases, ensuring seamless integration with your vehicle’s tire pressure monitoring system.
For more information or to purchase Autel TPMS sensors, visit the Autel TPMS Sensor Store.
1) Programmable Sensors
| Sensor Model | Form Factor | Frequency/Protocol | Typical Application | Reference Environment/Accuracy | Key Usage Points |
|---|---|---|---|---|---|
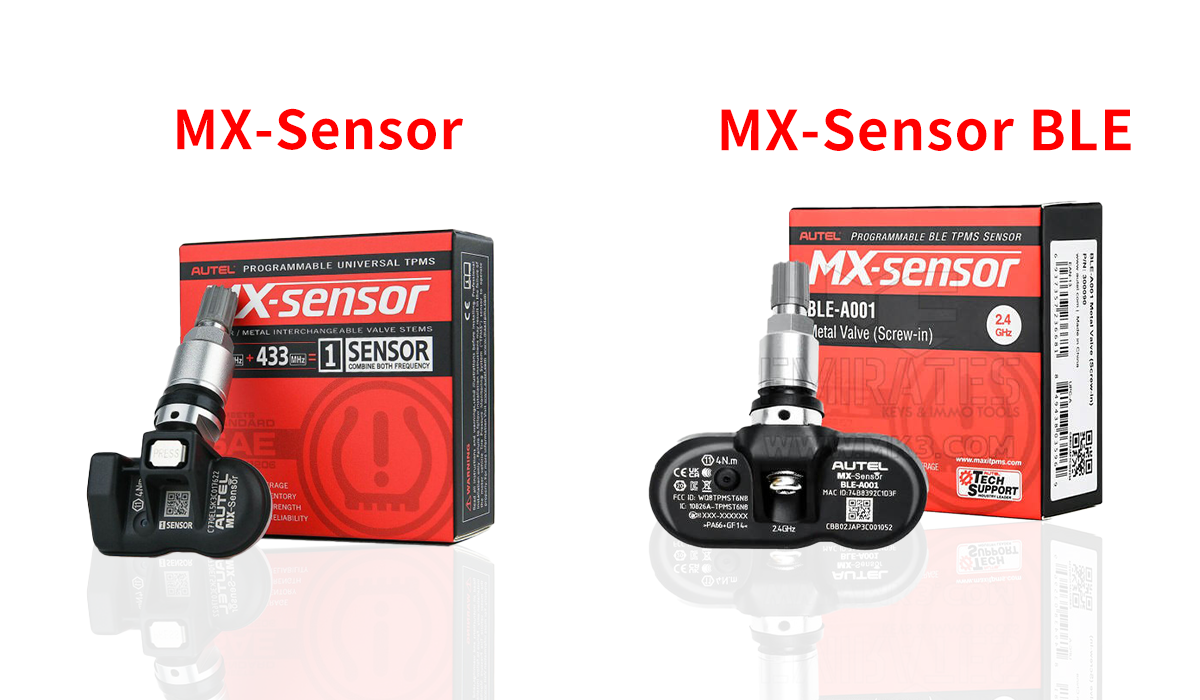
| MX-Sensor 2.0 | Integrated/Clamp-on | RF: 315/433 MHz (depending on vehicle/model/region) | Most gasoline/hybrid vehicles | Typical automotive environment, accuracy ≤ ±0.1 bar | Can be reprogrammed; needs to match vehicle frequency and installation form factor |
| MX-Sensor BLE-A001 | Integrated | BLE (Bluetooth Low Energy) | Some electric vehicles (e.g., specific Tesla models) | Must be used with BLE-supported ITS600/TS608 (after firmware upgrade) | Out-of-the-box pre-programmed; supports “plug-and-play”; BLE support required |
Note: Official model details may slightly vary across batches and regions. Always confirm temperature range, accuracy, battery life, and protection level using the label, packaging, or official manual.
Autel TPMS Sensor Selection Guidelines
When selecting the appropriate Autel TPMS sensor, you need to consider the following key factors: Frequency Matching, Form Factor Matching, and Protocol Matching. Below is a detailed guideline to help you choose the right sensor.
1. Frequency Matching
- North American Vehicles: Typically use 315 MHz frequency.
- European and Asian Vehicles: Typically use 433 MHz frequency.
- Dual-frequency/Auto-adaptive versions: Some sensors support dual-frequency (315 MHz and 433 MHz) or auto-adaptive frequency, which automatically switches based on the vehicle’s requirements.
2. Form Factor Matching
Currently, Autel offers only the MX-Sensor 2.0 with an Integrated design. All sensors are integrated sensors, meaning the sensor is directly built into the tire valve. Therefore, you do not need to choose between integrated or clamp-on designs, as the MX-Sensor 2.0 comes in an Integrated design only.
3. Protocol Matching
- RF (Radio Frequency Protocol): Used by most gasoline and hybrid vehicles, with frequencies like 315 MHz and 433 MHz.
- BLE (Bluetooth Low Energy Protocol): Required for some electric or hybrid vehicles, especially those like Tesla electric vehicles. Therefore, if you’re selecting a sensor for electric or hybrid vehicles, you must choose a sensor that supports the BLE protocol.
- BLE-compatible Tools: Ensure compatibility with tools like Autel ITS600 or TS608 if choosing a BLE sensor.
2) Matching and Programming Devices (Official Classification)
| Device Model | Key Functions (Official) | Typical User | Connection | Model Coverage/ Firmware |
|---|---|---|---|---|
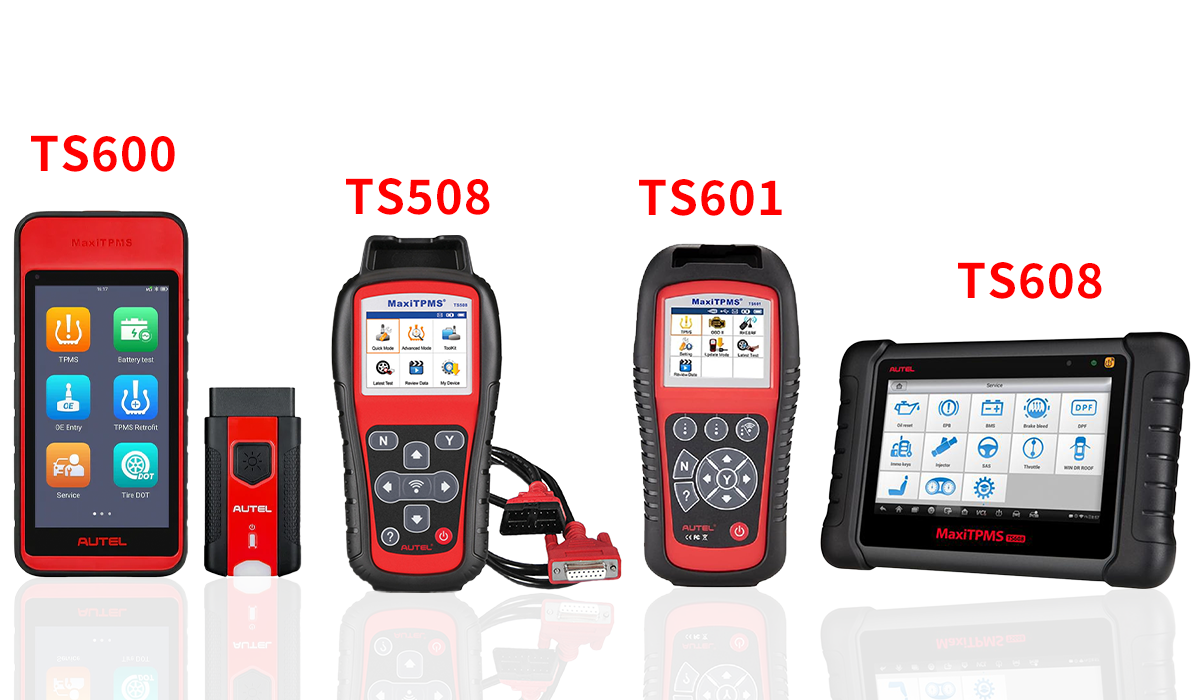
| TS508 | Read/Activate/Copy Programming, Basic Fault Clearing, 12V Power Supply | Home DIY/Small Shops | USB/Bluetooth | Covers mainstream 2006–2024 models; check via Coverage Guide |
| TS601 | Batch Programming, Wi-Fi Sync, Basic Fleet Management | Medium-sized Repair Shops | Wi-Fi/USB-C | Wider coverage; firmware regularly upgraded |
| TS608 | TPMS + OBD Deep Diagnostics, OBD Learning | Professional Shops | Wireless/USB-C | Supports direct ECU write; firmware upgraded as per official guidelines |
| ITS600 | 7” Touchscreen, CAN FD, BLE Workflow, Exclusive Guide for Electric Vehicles | Flagship Shops/Electric Vehicle Centers | Type-C | Wide coverage; update model database as per device prompts |
Coverage Guide (Model Coverage Query):
Visit the Autel TPMS official Coverage/Support page to check which models are supported by the current firmware by entering vehicle brand, year, and model.
2. Typical Scenarios for Replacing and Programming Autel TPMS (Aligning with Official Scenarios)
- Sensor Failure:
- Symptoms: The device indicates “No Response” or “Low Battery”, and the TPMS light on the dashboard remains illuminated.
- Cause: This often occurs when the sensor is no longer functioning properly, which could be due to battery depletion or internal sensor malfunction. Mechanical causes, such as tire punctures or air leaks, should be ruled out before replacing the sensor.
- Solution: In such cases, the Autel TPMS sensor needs to be replaced, and the new sensor must be programmed using one of the supported Autel devices (e.g., TS508, TS608).
- Changing Wheels/Rims or Dual-Set Wheels (Winter/Summer Tires):
- Symptoms: When switching to non-original rims or installing a new set of wheels, especially during seasonal tire changes, the existing TPMS sensors might not be compatible with the new wheels or rims.
- Cause: Non-original or aftermarket rims may have different installation positions or sensor attachment points. Additionally, if you are using winter and summer tire sets, each set may require its own set of sensors.
- Solution: When changing wheels, it is essential to either install new TPMS sensors or ensure that the existing sensors are correctly calibrated and programmed for the new wheel setup. Autel TPMS programming devices (such as the TS508 or TS601) can be used to match sensors to the new rims. For dual-wheel setups, programming for both sets of wheels will be required.
- Repairing ECU/After an Accident:
- Symptoms: Following ECU repairs or an accident, the TPMS system may no longer recognize the previously stored sensor IDs, or the signal paths may be altered.
- Cause: Accidents or ECU repairs can disrupt the TPMS system, causing the previously stored TPMS IDs to be erased or invalidated. Additionally, the sensor’s position or the signal communication path may change, especially if parts of the car were replaced or restructured.
- Solution: In such cases, the Autel TPMS system will need to be reprogrammed to ensure that the correct sensor IDs are re-registered with the ECU. This may require using Autel’s OBD learning mode (e.g., TS608 or ITS600) to write new sensor IDs to the vehicle’s ECU, ensuring that the TPMS system recognizes and functions properly.
3. Preparation and Safety (Official Standards + Global Best Practices)
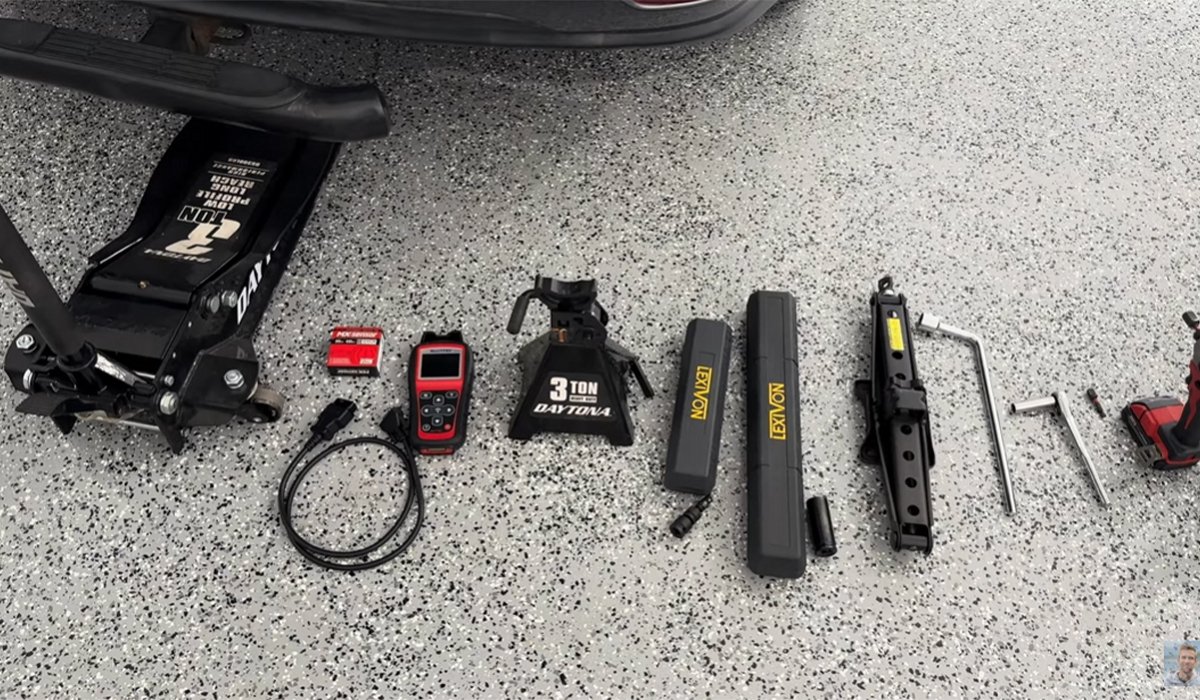
1) Tools and Materials
When working with Autel TPMS, using the proper tools is essential to ensure both safety and programming accuracy. Always confirm that your equipment meets the required specifications.
- Hydraulic jack (≥2.5 tons) and stable safety stands
- Torque wrench (0–200 N·m) with 17/19 mm sockets
- Plastic pry bar (to avoid damaging metal surfaces)
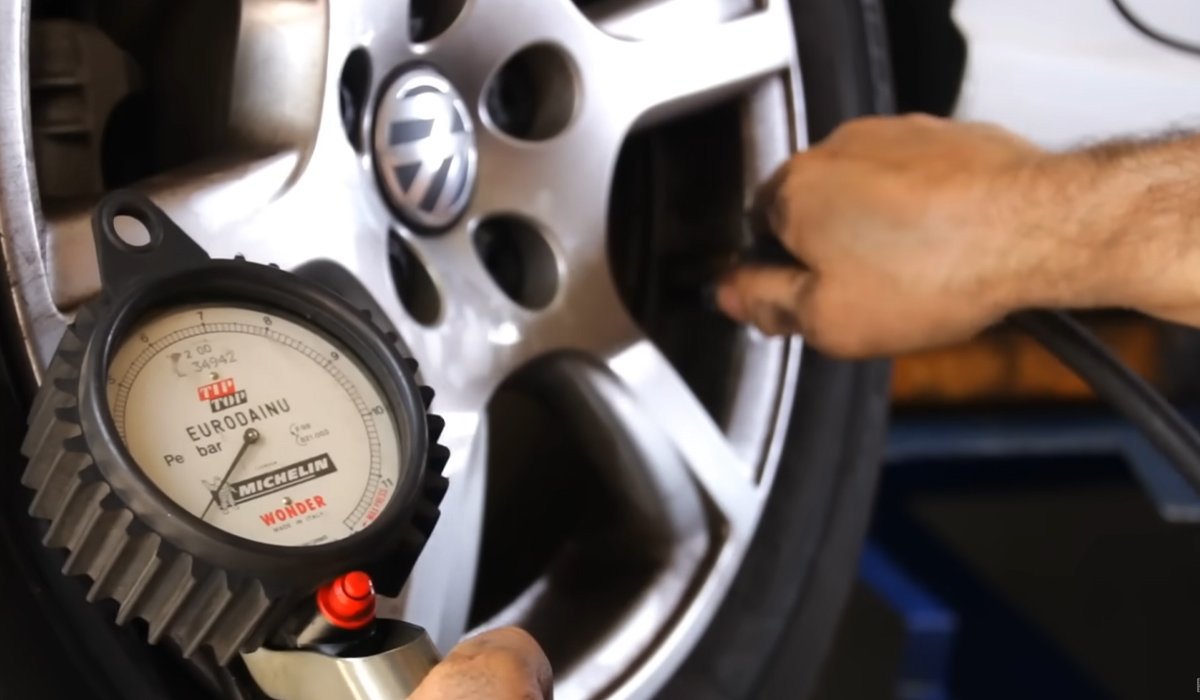
- Precision tire pressure gauge (recommended resolution: 0.1 bar)
- Soap solution or leak detector, clean cloth, and anti-rust spray
- Autel TPMS sensors and matching devices with the latest official firmware
Seals and Accessories:
Always use Autel TPMS original accessories—such as temperature-resistant sealing rings and valve components. Verify each item using the official parts catalog or packaging label to ensure full compatibility and long-term reliability.
2) Lifting and Equipment Safety
When servicing vehicles with Autel TPMS sensors, safety and equipment handling are critical.
- Park the vehicle on a flat, solid surface. Engage the handbrake and use wheel chocks diagonally.
- For electric or adaptive suspension vehicles, activate the “Lift/Service Mode” according to the vehicle manual.
- Align the hydraulic jack with the manufacturer’s lift points, and always use a secondary stand for support.
- Follow device prompts for OBD connection order. If the diagnostic tool battery is low, connect to a 12V power supply to prevent interruptions during TPMS programming.
4. Pre-Installation Decision Flow
Before starting any programming, verify the condition of the sensors and choose the correct procedure based on your Autel TPMS device. The following table summarizes each step of the decision process.
| Step | Condition | Action | Mode / Method | Notes |
|---|---|---|---|---|
| 1 | Can the old sensor ID be read? | ✔ Yes → Proceed with ID duplication | Copy ID Mode | This is the most efficient and reliable method for all readable sensors under the Autel TPMS workflow. |
| ✖ No → Move to Step 2 | ||||
| 2 | Does the target vehicle support auto relearn? (Check Coverage Guide) | ✔ Yes → Perform automatic relearn | Auto Relearn Mode | Follow the instructions provided by your Autel TPMS device and drive according to the Coverage Guide for system pairing. |
| ✖ No / Immediate delivery required | OBD Relearn Mode | Write the new sensor IDs directly to the ECU through the programming device. | ||
| 3 | Protocol type | RF vehicle → Follow RF programming process | RF Workflow | Apply the standard RF programming sequence. |
| BLE vehicle → Use BLE synchronization | BLE Workflow | For BLE-type models, follow synchronization prompts within the Autel device menu. |
5. Disassembly and Installation
Step 1: Removing the Old Sensor
Before removing the tire, ensure the vehicle is stable and power is off. Begin by releasing air pressure slowly. When working with an Autel TPMS system, always follow the proper removal sequence to avoid damaging the valve stem or rim.
- Deflate gradually: Remove the valve cap and use a tire pressure gauge to reduce pressure to around 0.2 bar to release tension.
- Loosen the nuts and lift the vehicle: Loosen each nut diagonally by one or two turns, lift the vehicle using a hydraulic jack, and secure it with safety stands.
- Remove the sensor:
- Integrated Type: Loosen the external retaining nut counterclockwise (refer to the instruction manual for torque specs), then gently push out the inner sensor unit.
- Clamp-in Type: Insert a plastic pry bar at the clip slot and gently release the Autel TPMS sensor until you hear a light “click.”
- Read and save the old ID: If possible, scan the old sensor within 3 cm of the programming device and store the data for future use in Copy ID mode.
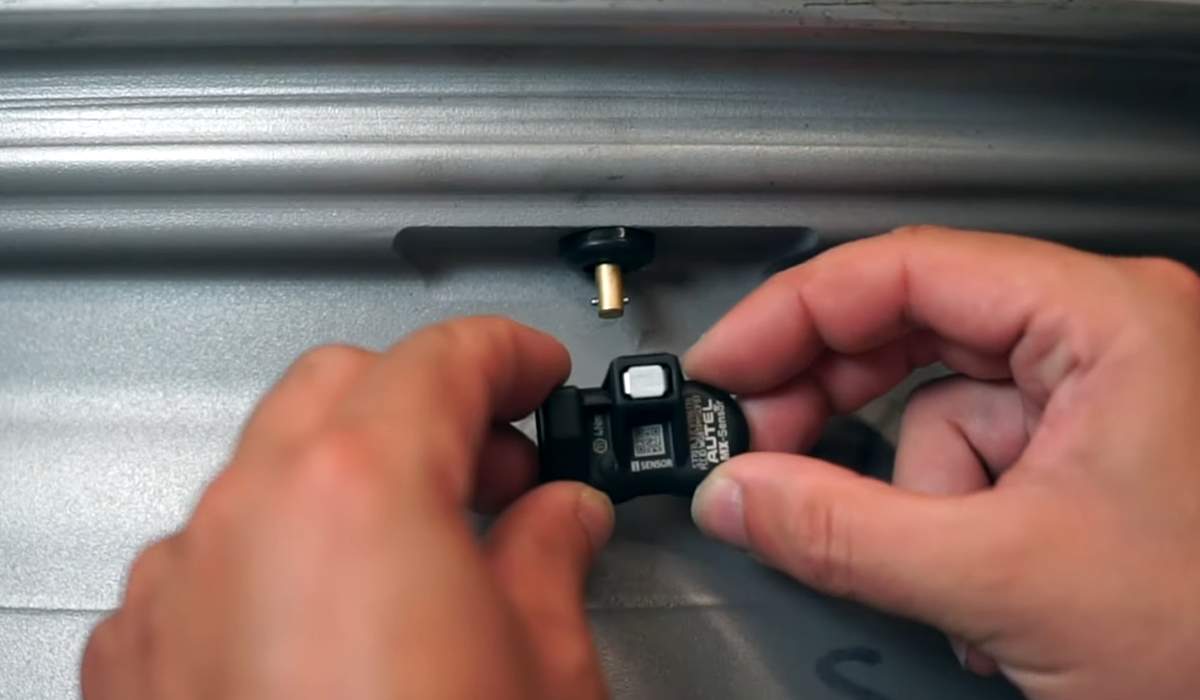
Step 2: Installing the New Sensor
When installing a new Autel TPMS sensor, make sure the frequency, mounting style, and protocol match the vehicle specifications (315 MHz or 433 MHz).
- Confirm version compatibility: Verify the correct sensor type before proceeding.
- Pre-test activation: Use the programming device to detect and activate the sensor; confirm the status reads “Normal” or “Activated.”
- Assembly:
- Integrated Type: Insert the sensor from the inner side, then tighten the external nut to the torque specified on the package (typically 4–8 N·m, depending on the model).
- Clamp-in Type: Press the sensor into the mounting slot until it clicks securely. Ensure wiring or the valve body is not pinched.
- Direction and leak inspection: Align the valve stem according to the manual. Apply soapy water around the valve base and confirm there are no bubbles—this ensures the Autel TPMS installation is airtight.
Step 3: Reinstallation and Inflation
- Reinstall the wheel: Clean the hub surface, apply a thin layer of tire sealant if necessary, and hand-tighten nuts diagonally for even pressure.
- Final torque setting: Lower the vehicle and tighten the nuts diagonally again according to the manufacturer’s torque specification; a double-check is recommended.
- Inflate to correct pressure: Fill tires to the door-frame pressure label value. If the front and rear pressures differ, adjust in 0.05 bar increments for precision.
6. Three Official Learning/Programming Modes (Priority and Operation)
Principle: First, Copy → If Auto-learnable, use Auto-learn → If Immediate, use OBD.
Note: Device menu naming may vary slightly, refer to on-screen instructions.
A. Copy Mode (Copy ID) — Official Preferred
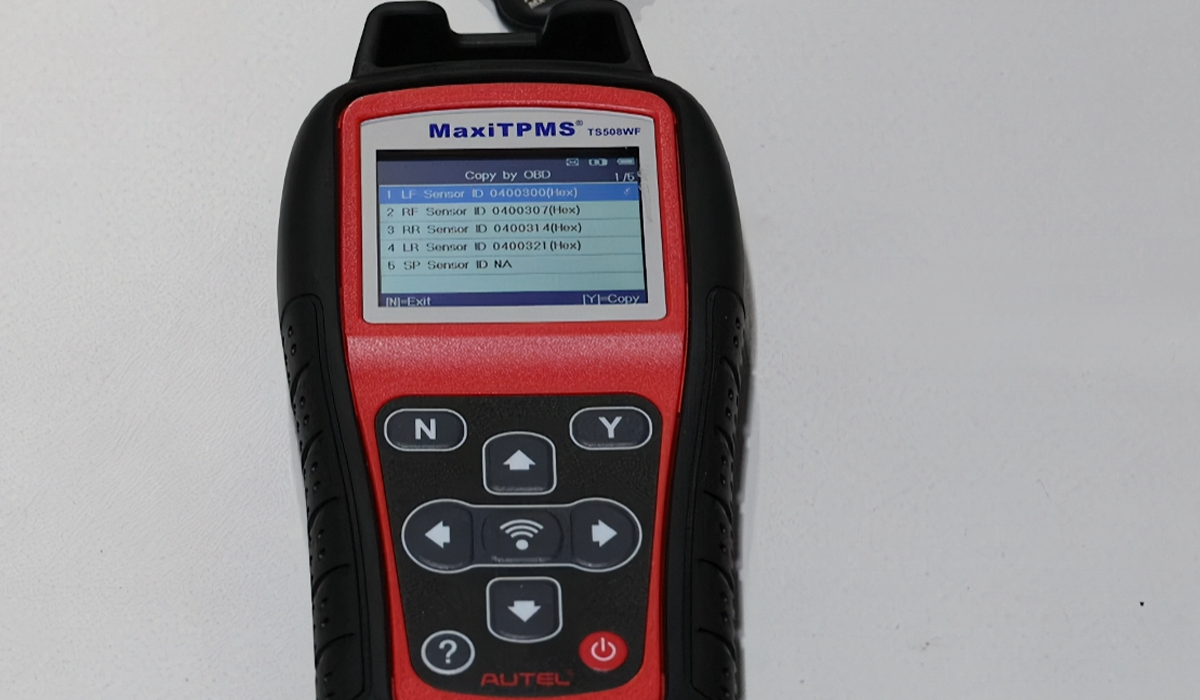
• Applicable: Most vehicles where the old sensor ID is readable.
• Steps:
- Read the old sensor ID and save it.
If the old sensor ID cannot be read, you can either use the device to directly read the ECU ID or check the ID printed on the sensor itself. - Select “Copy Programming” and write the old ID to the new Autel TPMS sensor.
- Mount the sensor on the vehicle, turn on the ignition, and drive at low speed for 3–5 minutes to trigger recognition.
- Proceed to validation (see Section 7).
• Advantages: No ECU archive modification, compatibility, and efficiency are usually better.
• Troubleshooting: If not recognized, check the installation orientation/frequency, re-read the new Autel TPMS sensor ID, and ensure stable voltage.
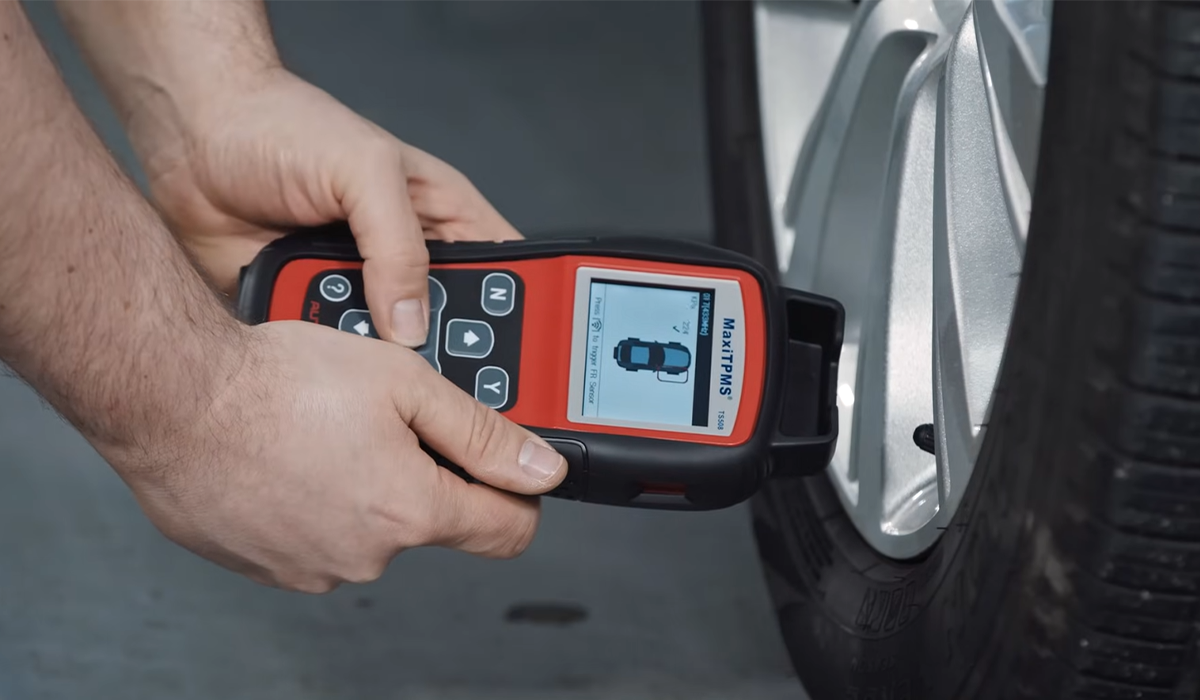
For Autel TPMS programming devices, you can check out the Autel TPMS Devices Store for more details or to make a purchase.
B. Auto-learn Mode (Auto Relearn) — Must be Supported by Vehicle
• Applicable: Vehicles listed as auto-learnable in the Autel TPMS Coverage Guide; the old sensor ID is not readable.
• Steps:
- Generate and write new IDs for all four wheels (each one unique).
- Activate each sensor in order (LF → RF → RR → LR).
- Drive at low speed or perform steering/turning or a specific speed for 5–10 minutes based on vehicle operation conditions.
- After the light turns off and the display updates, proceed to validation.
• Note: Some European vehicles may not support this mode; switch to OBD learning mode if unsuccessful.
C. OBD Learning (OBD Relearn) — Directly Write to ECU
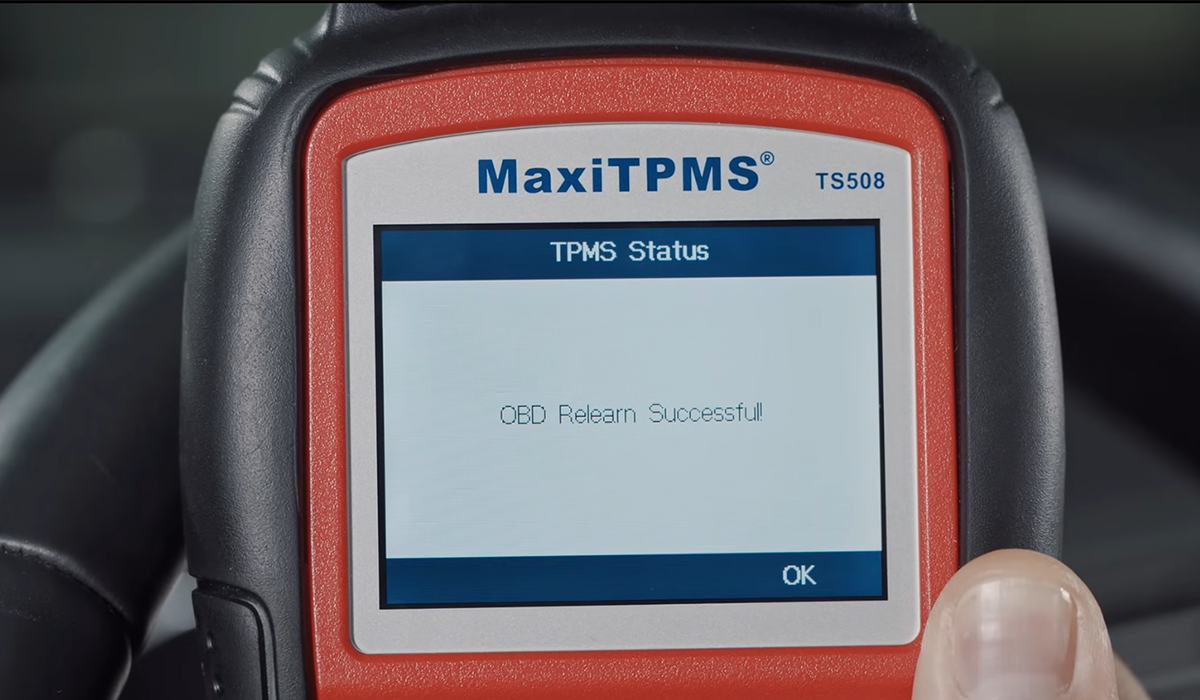
• Applicable: Vehicles that support OBD writing; required for immediate effect, such as during dealership handover or after ECU replacement.
• Steps (Example using ITS600/TS608):
- Connect the OBD device, turn the ignition to “ON”.
- The device will automatically detect the vehicle and enter “OBD Learning”.
- Activate and read all four Autel TPMS sensor IDs.
- “Write to ECU”, once completed, the TPMS light will typically turn off and display will update immediately.
- For BLE vehicles: After completing, perform “BLE Synchronization/Refresh” under the “New Energy/BLE Features” section.
• Additional: Some models may require inputting a safety code before writing (the device can read this). Follow the on-screen prompts to perform “Instrument/System Refresh”.
7. Learning Verification & Handover Checklist
To keep the process consistent and easy to audit, verify that the vehicle’s TPMS is working as expected before delivery. The steps below reference your autel tpms workflow but rely on the vehicle’s own dashboard indicators for the final check.
1) Basic verification (required)
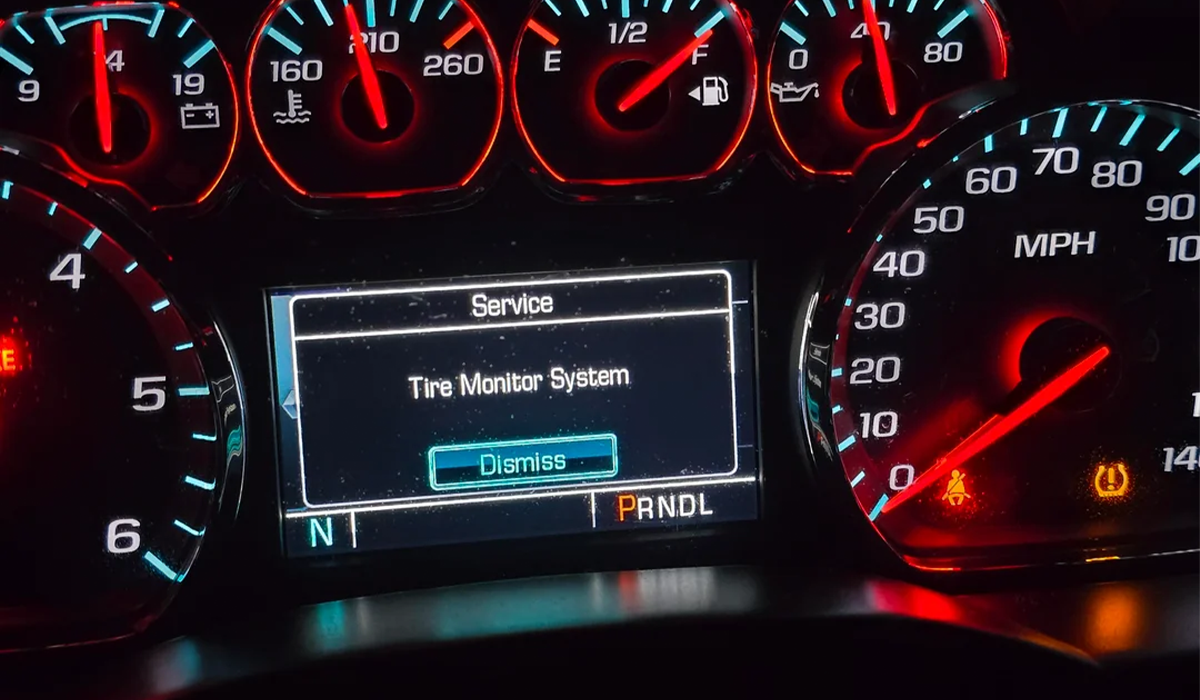
- TPMS warning light
After switching the ignition on, the TPMS warning light on the dashboard should turn off within about 30 seconds. If it stays on, read and clear TPMS-related DTCs with your tool and perform the appropriate relearn again. - Pressure-change confirmation
On any one tire, slowly bleed about 0.2 bar (e.g., 2.4 → 2.2 bar). The dashboard should refresh within roughly 10 seconds and track the new value. Reinflate to the door-jamb spec and confirm the display returns accordingly (aim for ≤ ±0.1 bar difference to a calibrated gauge). If values do not update, use your autel tpms tool to recheck sensor IDs and relearn order.
2) Dynamic verification (recommended)
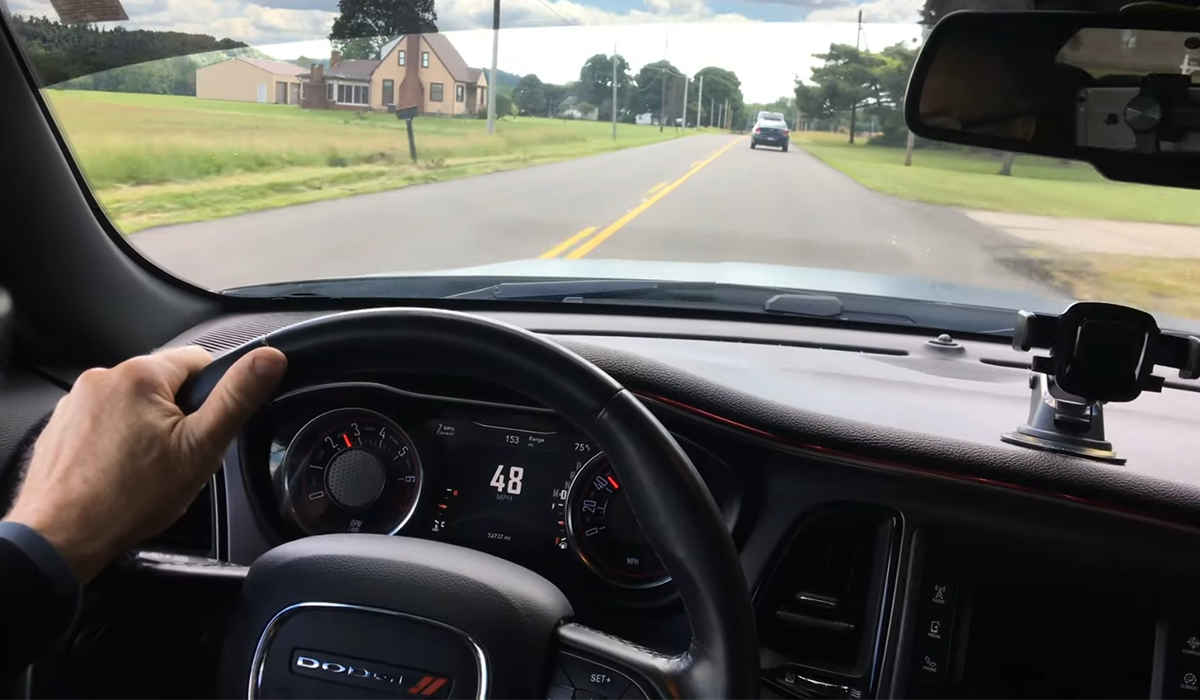
- Low/medium speed
Drive 3–5 minutes at neighborhood speeds while watching live tire data. The readings should remain stable with no dropouts or “—” placeholders. - Higher speed
Briefly increase speed to ~80–100 km/h (where safe and legal). Confirm that pressure and temperature values continue to update normally. If you see lag or a missing wheel, review the last relearn and run an on-vehicle test from the autel tpms diagnostics menu.
3) Handover checklist (printable)
| Check item | Pass criteria | How to verify |
|---|---|---|
| TPMS warning light | Turns off shortly after ignition | Observe the dashboard indicator |
| Pressure display | All four tires show valid values (no “—”) | Compare against a calibrated gauge (target ≤ ±0.1 bar) |
| Temperature display | Values present and plausible for ambient | Cross-check on the cluster/infotainment screen |
| TPMS DTCs | No active TPMS-related codes | Scan and clear with your tool; recheck |
| Sensor mapping | LF/RF/RR/LR positions correctly recognized | Trigger each wheel and confirm its position updates |
| Dual-set note (if applicable) | Customer understands winter/summer set switch steps | Provide a one-page quick guide and demonstrate the process |
Documentation note: Record final sensor IDs, tire pressures, and date/time of verification on your job card. Keeping an autel tpms printout (or PDF) with the vehicle file helps future service and warranty tracking.
8. Common Issues and Troubleshooting Guide
| Issue | Possible Cause | Solution |
|---|---|---|
| Device cannot read the old sensor ID | The old sensor may be fully depleted or unresponsive. | Use the autel tpms device to directly read the ECU’s stored ID and copy it to the new sensor. In most cases, driving a short distance will make the data appear automatically, or create a new ID using OBD Relearn. |
| TPMS warning light remains on after relearn | The ECU may still store incorrect data, or the sensor model is incompatible. | Check whether the installed sensor model matches the vehicle type. If correct, disconnect the battery power briefly and perform the relearn again using your autel tpms programming tool. |
| Some tire positions are not displaying | The relearn process may not have been completed successfully. | Perform the learning process again, ensuring all four sensors are activated in the correct order. |
| OBD write failure | ECU system instability or communication errors between the diagnostic port and tool. | Try relearning using another compatible device. If the issue persists, contact your dealer to run a specialized diagnostic test with OEM tools. |
| Signal intermittently lost at high speed | Electromagnetic interference or incompatible aftermarket sensors. | Eliminate potential interference sources. If the issue continues, replace the sensors with genuine OEM-compatible ones to ensure full functionality. |
9. Best Practices for Using Two Sets of Wheels (Winter/Summer Tires) with a Shared Sensor ID

Core Concept:
By copying the same sensor ID for both sets of tires, the vehicle will always recognize them as the same set, completely eliminating the need for repeated learning after each tire change.
1). Sensor Setup and ID Copying
For each set of wheels, equip it with one Autel MX-Sensor.
Key Step: Use Autel TPMS professional tools to copy (clone) the four sensor IDs from the original vehicle sensors to the new set of sensors. Ensure both sets of wheels have the exact same four IDs, allowing for seamless tire swaps without the need for re-learning each time.
2). Labeling and Recording
Attach clear LF (Left Front), RF (Right Front), LR (Left Rear), and RR (Right Rear) position labels to each set of wheels.
Record the corresponding sensor IDs and installation dates in your device or on a form for long-term management.
3). Switch Logic
Simply replace the tires: Whether or not your vehicle supports “auto learning,” as long as the IDs have been copied correctly as described above, during seasonal tire changes, simply replace the wheel sets and drive normally. The vehicle will recognize the stored Autel TPMS ID, and no alerts will trigger, nor will any learning or matching operations be required.
Important Reminder: Ensure that only one set of wheels is installed or near the vehicle at any given time. Store the idle set of wheels away from the vehicle to avoid signal interference.
4). Idle Tire Set Maintenance
- Monthly: Check the tire pressure and maintain it at ≥2.0 bar to prevent tire deformation.
- Every 6 months: Use the Autel TPMS tool to activate and check the sensor to ensure its battery and functionality are in good condition, preventing issues from long-term idle periods.
10. Maintenance and Care (Official Recommendations + General Practices)
- Firmware Updates: Regularly update the device and vehicle database using Autel Official Software to ensure new vehicles are supported.
- Status Inspection: During seasonal changes or maintenance, use the device to check the sensor’s battery and signal status.
- Seals and Parts: Replace original parts (such as seals or valve stems) if they show signs of aging or after multiple removals. Specific part models can be found on the official parts page.
- Climate Considerations: In cold regions, allow the sensors to reach room temperature before programming. In hot climates, avoid exposure to direct sunlight before operating. In coastal areas, regularly clean and protect metal parts from corrosion.
FAQ (Frequently Asked Questions)
Q: Can the MX-Sensor be reused across different vehicle models?
A: Yes, the MX-Sensor can be reused, but the frequency (315/433 MHz), installation form, and protocol (RF/BLE) must be compatible. Before reusing, it is necessary to clear the old ID and perform the relearn process.
Q: Is it necessary to use only Autel original equipment?
A: It is recommended to use Autel equipment. It ensures complete compatibility with official sensors and processes, and you will receive firmware updates and coverage support. Third-party devices may be incompatible and could affect warranty.
Q: How long does the self-relearning process take?
A: The duration depends on the vehicle model (details can be found in the Coverage Guide). Typically, it involves a few minutes of low-speed driving or turning. If it is unsuccessful, switch to OBD relearn.
Q: How soon will the sensor data display after replacement?
A: The sensor data will display quickly for ID copy and OBD relearn. For self-relearning, the process may take some time depending on the vehicle conditions.
For more details on sensor compatibility and relearn methods, you can visit the official Autel TPMS Coverage Guide: Autel TPMS Coverage Guide
Conclusion and Compliance Notice
This article is strictly compiled from the official sources you provided and regulatory documents. It eliminates unverifiable market data and third-party endorsements. In practice, always refer to the vehicle manual, sensor packaging, and Autel official manuals/device screen prompts. If you encounter model differences or specific error messages, first consult the Coverage Guide, update the firmware, and then follow the official guide in the device step-by-step.